
Designer Rail Layout
Laying out aluminium balusters on hardwood and softwood sub-rails, then repeating the layout on the rake of a stair section.
- 01
Measure the sub-rails separately
Top and bottom sub-rails are measured and cut separately. They are not assumed to be the same length, because the rail posts may not be plumb.
- 02
Lay the sections out on the ground
The sub-rails for each section are laid side by side on the ground, splitting the difference in length where the two are uneven.
- 03
Mark the centre
Measure to the exact centre point of the longest sub-rail and make a small pencil mark.
- 04
Work outwards at 4-3/4 inch centres
From that centre point, mark every 4-3/4 inches out to both ends. Those marks are the screw positions for the baluster connector, or the centre points for a 3/4 inch hole. The spacing gives a 3-3/4 inch opening once the balusters are in place, which is what keeps the opening under the four inch figure that most building requirements set.
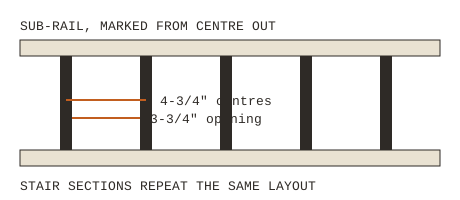
Marks are worked outwards from the centre of the longest sub-rail so that the two end bays match. - 05
Set the balusters
Once the connectors are mounted, or the holes are drilled in softwood, the balusters are placed at their marks.
- 06
Build the stairs before the rail
Stair sections, stringers and treads are installed before the rail goes on them.
- 07
Repeat the layout on the stair sub-rail
The sub-rails are placed on the stair section and the same measuring sequence is repeated along them.
- 08
Drill the shallow seat
Drill a very shallow 3/4 inch diameter hole at 90 degrees at each mark, using a Forstner bit in Ipe or a paddle bit in softwood. Held at 90 degrees, the shallow seat conceals the straight cut end of the baluster on the rake.
- 09
Mount the connectors and fit
After the holes are drilled, a connector is mounted in the centre of each one, and the sub-rail is ready to accept the baluster.